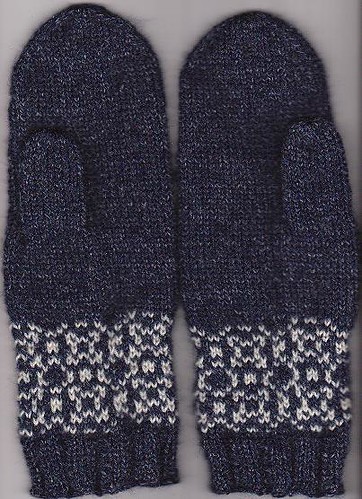
Tulpen
© Bianca Boonstra 2007
Voor deze wanten heb je nodig:
Ca 100 gram Merino (ik heb voor deze wanten gebruikt: Jaeger Matchmaker, kleur SH 900) en enkele restanten wit, groen en geel.
4 Naalden zonder knop 3.5 mm
Veiligheidsspeld
Stopnaald.
Opzetten met de hoofdkleur 48 steken. Verdeel ze over 3 naalden als volgt: 12/24/12 steken.
Stekenverhouding: 23 steken en 32 naalden is 10 x 10 cm
Brei 20 rondes in boordsteek – 2 recht, 2 averecht.
Vervolg met 2 naalden recht.

Brei recht volgens schema – het schema toont de helft van het patroon en de zigzaglijntjes worden gebreid in wit.
Na de bovenste zigzaglijn: 10 rondes recht breien in de hoofdkleur.
De duim: Plaats voor de rechterwant de eerste steken van naald 3 op een veiligheidsspeld, en voor de linkerwant de laatste 8 steken van naald 1 op een veiligheidsspeld. Maak in de daaropvolgende ronde voor de duimboog 4 omslagen, en brei die in de ronde erna recht.
Brei recht tot de pink volledig is bedekt.
Minderingen:
1 – Naald 1: Brei tot 3 steken voor het einde, 2 steken samenbreien, 1 recht.
Naald 2: 1 recht, 2 steken overgehaald samenbreien, doorbreien tot 3 steken voor het einde, 2 steken samenbreien, 1 recht.
Naald 3: 1 recht, 2 steken overgehaald samenbreien, doorbreien tot het einde van de naald.
2 – Gehele ronde recht breien.
Herhaal deze twee stappen tot de middelvinger is bedekt. Knip dan de draad af op 15 cm vanaf de want, haal deze met behulp van de stopnaald door de resterende steken en sluit de bovenkant van de hand, door de draad goed aan te trekken, de naald naar de binnenkant door te steken, en goed af te hechten.
De duim: Neem de steken op van de veiligheidsspeld. Neem in de duimboog 12 steken op. Brei deze 20 steken in het rond, tot de duim volledig is bedekt. Knip dan de draad af op 15 cm vanaf de want, haal deze met behulp van de stopnaald door de resterende steken en sluit de bovenkant van de duim, door de draad goed aan te trekken, de naald naar de binnenkant door te steken, en goed af te hechten. De draadjes aan de binnenkant van de want afhechten. Brei de tweede want. Succes en veel draagplezier.
Tulips
© Bianca Boonstra 2007
For this pair of mittens you’ll need:
Approximately 100 grams Merino (I used: Jaeger Matchmaker, colour SH 900 (2 skeins of 50 grams) some left-over yarn in white, yellow and green.
4 double pointed needles 3.5 mm (US #5)
A piece of waste yarn to place stitches for the thumb on.
Darning-needle
Gauge: 23 stitches and 32 rows is 4 x 4 inch
Cast on with the main colour: 48 stitches. Divide them over 3 needles as following: 12/24/12 stitches.
Ribbing 20 rounds – knit 2, purl 2 .
Continue to knit 2 rows.
Knit according to the pattern – the zigzag lines are done in white.
After the upper zigzag line: knit 10 rounds in the main colour.
Thumb placement: Place for the right mitten the first eight stitches of needle 3 on a piece of waste yarn, place for the left mitten the last eight stitches of needle 1 on a piece of waste yarn.
In the next round, add for the thumb bow 4 yarn over’s. Knit these in the next round.
Continue to knit in the main colour until the little finger is covered.
Decreases: Step 1
Needle 1: Knit until 3 stitches before the end. Knit 2 stitches together, knit one.
Needle 2: Knit 1, SSK (slip, slip, knit), knit until 3 stitches before the end. Knit 2 stitches together, knit one.
Needle 3: Knit 1, SSK (slip, slip, knit), knit to the end of the needle.
Step 2: Knit the entire round.
Repeat these two steps until the middle finger is covered. Cut yarn at approximately 3 inch from your work. Work the thread with help of the darning needle through the stitches and pull the thread to close the hand. Push your needle to the inside, turn the mitten and fixate the stitches.
Thumb: Pick up the stitches that were set aside and place them on the needle. Pick up 12 additional stitches and divide these over 2 needles. Knit these 20 stitches in main colour until the thumb is covered. Cut yarn at approximately 3 inch from your work. Work the thread with help of the darning needle through the stitches and pull the thread to close the thumb. Push your needle to the inside, turn the mitten and fixate the stitches. Work away threads. Knit second mitten. Enjoy warm hands!




 Slalom Socks
 Bubble Socks